Wow, it has been a little while since my last update and there’s a lot that I’d like to post on here. I keep meaning to be more regular with my updates, but I find it so easy to get lost in my work. In this post, I’ll try to summarize what I have been working on through October, November and December. I’d also like to add a small update on what I’ve been trying to work on for myself apart from my school work. So the short of it is this is going to be a long post, divided into sections for October, November, December and personal.
OCTOBER
I don’t remember if I mentioned this earlier, but I am currently enrolled with Fullsail University. One of the neat things about studying with them is that everything is modular, so every month is a new course or class. In October my class was Texture Painting and Sculpting, or TPS.

For the first weeks assignment we were to hand paint and texture a very simple room. The textures were required to be tillable and one was to be a wood chunk, another a brick, a tile and a banner/detail piece for the one wall. I really liked the symbol that I made for the flag, it is supposed to be an S and R put together as a way of signing the piece. 
With the week two assignment I was supposed to paint and texture a barrel and I needed to have some three distinct texture types, such as metal wood and cloth. Unforetunately I misunderstood the assignment and did three different barrels, when all I actually needed was one barrel that made use of the different textures. I also actually tried to draw a little green squid creature inside the third barrel,but it really didn’t work very well so I wound up removing him. I couldn’t effectively make it look like he was in the center when I was painting it on the outside.

For week 3 I textured a wall and sidewalk piece in a more modern/realistic style. This one was primarily created in zBrush. I had the basic low polygon shapes ready in Maya and then made high poly, high detail versions in zBrush. I enjoy this workflow and it is the same idea as what I used to make the Cambodian temple assets in August. Looking at it now, I would like to change some of the reflectivity on the surfaces as it still seems a bit too specular and the colours also seem a little too saturated.

For week 4 I was to texture and paint a Sci-fi crate, I added a lot of wear to the crate based on a tutorial at http://forums.cgsociety.org/showthread.php?t=373024. However with this crate, I had baked a lot of the details and textures from a high-poly version of the crate down to a low-poly so that the edges would curve nicely and look smooth. This lead to a problem with none of the scratches and wear actually showing on the crate outside of the diffuse. it didn’t actually feel like the crate had been scratched or scuffed. In order to actually give the scratches depth and texture, I had to bend do some custom work in the Maya shader to let me apply both a bump map and a normal map to the object. I felt like it came out looking pretty good although I do which I could have added more visually appealing things to the case as it looks pretty bland right now. But for the week it was actually a really good experience at working with Maya shaders to do a bit more than they are typically intended for.
NOVEMBER
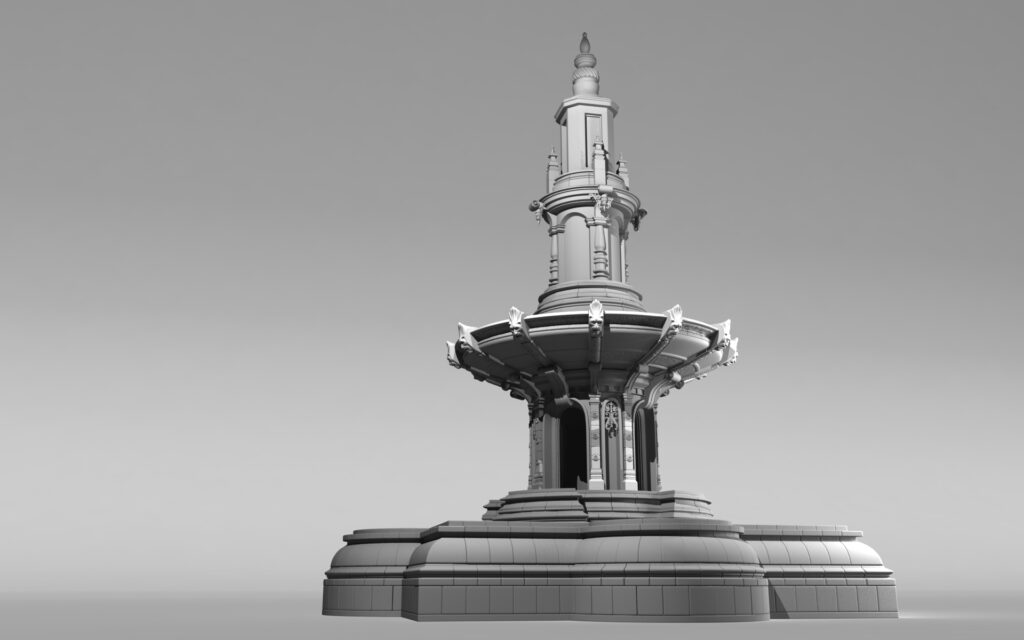
For the month of November my class was Level Assembly and Creation or LVL. While I was working through this class, I also worked through a tutorial series from Eat3d.com called the fountain. Their tutorial was done with zbrush, mudbox and 3dsMax. I wound up doing the work in Maya and Zbrush as the mudbox stuff was the exact same as the zbrush stuff just different software. I was really happy with the way this project turned out and used it as a large part of the inspiration and design for the rest of my level. The Level itself was meant to be heavily inspired by the Tron movie and also gothic Architecture. Although I wish I would have been able to work more with the gothic style in it. This project was really enjoyable and I still have a lot more that I would like to do with it if I ever get the chance to work on it again. In the meantime it was a great experience for building and testing out an art style that was quite a bit different than anything else I’ve tried before. The biggest problem I ran into though was in getting clean map bakes. I was getting a lot of artifacts and distortion whenever I transfered my high poly details to the low poly maps, and I still run into problems with it. However I found that the Substance designer 3.5 baking tools were a lot more effective for me than xNormal or crazybump were. I learned a lot about substance designer on my own through this month, and wound up doing all my textures with it. I got the personal edition on steam on November 4 and by November 25th I had logged well over 80 hours in the program. On November 25th they released substance designer 4 on steam and had a promotional discount of 50% so I wound up upgrading to the full commercial edition at that point. The other big thing with this month was the water shader that I put together for my level to use. I was really happy with the way it turned out and that I had made it from scratch in the kismet editor, admittedly while following along with a tutorial. I tend to use a lot of different tutorials while I work and I take what I need from them to make what I want. I am looking forward to the time when I will be able to put together some tutorials of my own, but that won’t be for a long while yet. I’m going to attach several images from this month’s project below, but I will be continuing my post after them so feel free to scroll on down.


With a lot of my assets, I was driving their emissive channels with a curvature map, which causes the edges to glow and gives a tron look to everything. However after I had the assets in the game engine I wasn’t happy with how it looked like that and I was redoing them so that they glowed from inset areas instead and I also changed up their profile so that they looked a lot more interesting. I’ve uploaded the udk exe for the map so you can get a better idea of how things are loking in engine if you would like to. With the level, as I said I am in the process of switching from curvature driven emissives to more strategically placed emissives. I would like to make everything quite a bit more glossy as well. I also want to add a button to the lower platform that makes the stairs rise up out of the water and slide into place with water droplets falling as the rise. With the main room, their are six lasers that are always on, I wanted to make them so that they turn on once you step onto the lowered floor section and I wanted several more to start shooting out of similiar spots on the walls. The exe can be found at: https://www.dropbox.com/s/fchy5kvr5a4yvon/UDKInstall-Alpha.exe
DECEMBER
Occasionally I get two classes at the same time in a month, this month I had Interpersonal Communication(IPC) and Project Managment and Assessment III(PMA). IPC was an interesting enough class but not really relevant to what I track on my blog here. PMA however was a lot more relevant and was my declaration of specialization and an art test to make sure that I would actually be able to work in that area effectively. I chose to specialize in prop creation as I want to be able to build a world and I feel as though the props and models that make up the environment are what actually give the world its personality and life. The first week project was to create a high poly version of an old wooden radio, and then the second weeks task was to create a low poly version of the radio with diffuse, normal and specular maps. Week 3 and 4 were similiar except this time it was a plastic motorola radio that needed to be created. Here are the photos of the references and then each weeks turn-in.


PERSONAL
This finally brings me to some of the stuff I’ve been working on personally. As I said earlier I have and enjoy Substance designer for my texturing work. However I recently purchased Modo as it was on a christmas promotion and I have heard wonderful things about its modeling and topology tools. However, I have also heard that its animation tools are not as mature as those found in maya. I bought Modo for my personal and portfolio projects, I have access now to much of the functionality that I need from maya but at a much better price and supposedly better modeling workflow. I have several tutorials from the gnomon workshop for Modo and I am hoping to work through most of them before my classes start up on the 6th of January again. The one that really excites me is called “Creating a 3D Figure Study” A three hour workflow with Jeremy Engleman. It’s an approach to creating figure studies in 3d with Modo, Zbrush and 3DCoat in roughly three hours. I am really looking forward to working through it and I hope to be able to continue to do one every week through the new year. Which brings me to the next piece of software I’ve grabbed, which is 3dCoat it looks like an interesting alternative to zbrush(which I love and have commercially, but need to keep working with) and with Christmas sales, it’s only a fraction of the price. The only other license that I actually need to get for me to be able to create my own games is a pro license for unity, which I also need to continue working with. I have been working through a book called Creating Games with Unity, and I am looking forward to finishing it so that I can work on my own project. I’m really excited for the near future of video games, and I just recently received an Oculus Developer Kit, and intend to incorporate it heavily in the project that I have been preparing for. So to sum up my intended software and pipeline for my projects is Modo, ZBrush, Substance Designer and Unity Pro( though 3dcoat may play a role there as well.) I’ve still got a lot of work to get done, but I’m loving it and looking forward to what is to come.